Simple React Development in 2020
Hi, aspiring React developer! 👋
Maybe you’re a jQuery developer looking to experiment with a modern framework. Or, maybe you’re an Angular developer wanting to see what all the hype is about. Maybe you’re a seasoned back-end or systems programmer looking to make the jump to front-end. Maybe you’re new to programming in general, but want to learn how to build dynamic web applications.
Regardless of your background, you’ve likely had a similar experience: React itself seems pretty straightforward, but the tooling and ecosystem is overwhelming.
You probably feel like this guy:
](https://cdn-images-1.medium.com/max/3500/1*BZ-Q42ZmZID9Jfhib12dEQ.png) https://twitter.com/thomasfuchs/status/834481271443226627
https://twitter.com/thomasfuchs/status/834481271443226627
I’ve seen and heard variations on this theme frequently. Especially for newcomers, React development can often seem like a complex maze of tools and libraries. Even experienced developers talk about how complicated modern web dev is, and pine for the simple days of just opening an editor and writing.
However, this is a solved problem!
Over the past few years, the React community has put a ton of effort into creating a tool that allows React developers to get up and running almost as quickly as downloading a dependency and opening an editor.
The goal of this guide is to help create your first React app. It shares a step-by-step process, from initial system setup through to deployment, without straying into tangent explanations that aren’t critical at this point in the learning process.
No prior experience with React or its related tools is required, although it does assume that you know the basics of working with a command line and git.
This is a living document, and I’ll be updating it as the landscape changes.
Last Updated: December 9th, 2019
The Quickest Start: CodeSandbox
CodeSandbox is an online REPL. It’s friggin’ amazing.
It lets you instantly bootstrap a React project with everything you need. It runs in the browser, but it supports multiple files, third-party dependencies… It uses VS Code as its editor, which is *wild. *It’s essentially a full development environment that runs in-browser, and I can recommend it without reservation. You can build a full application using CodeSandbox.
There is something to be said for having everything run on your local machine, so we’ll cover that as well. But if you’re looking for a rocketship-speed start, head over to CodeSandbox, and jump straight to Step 3.
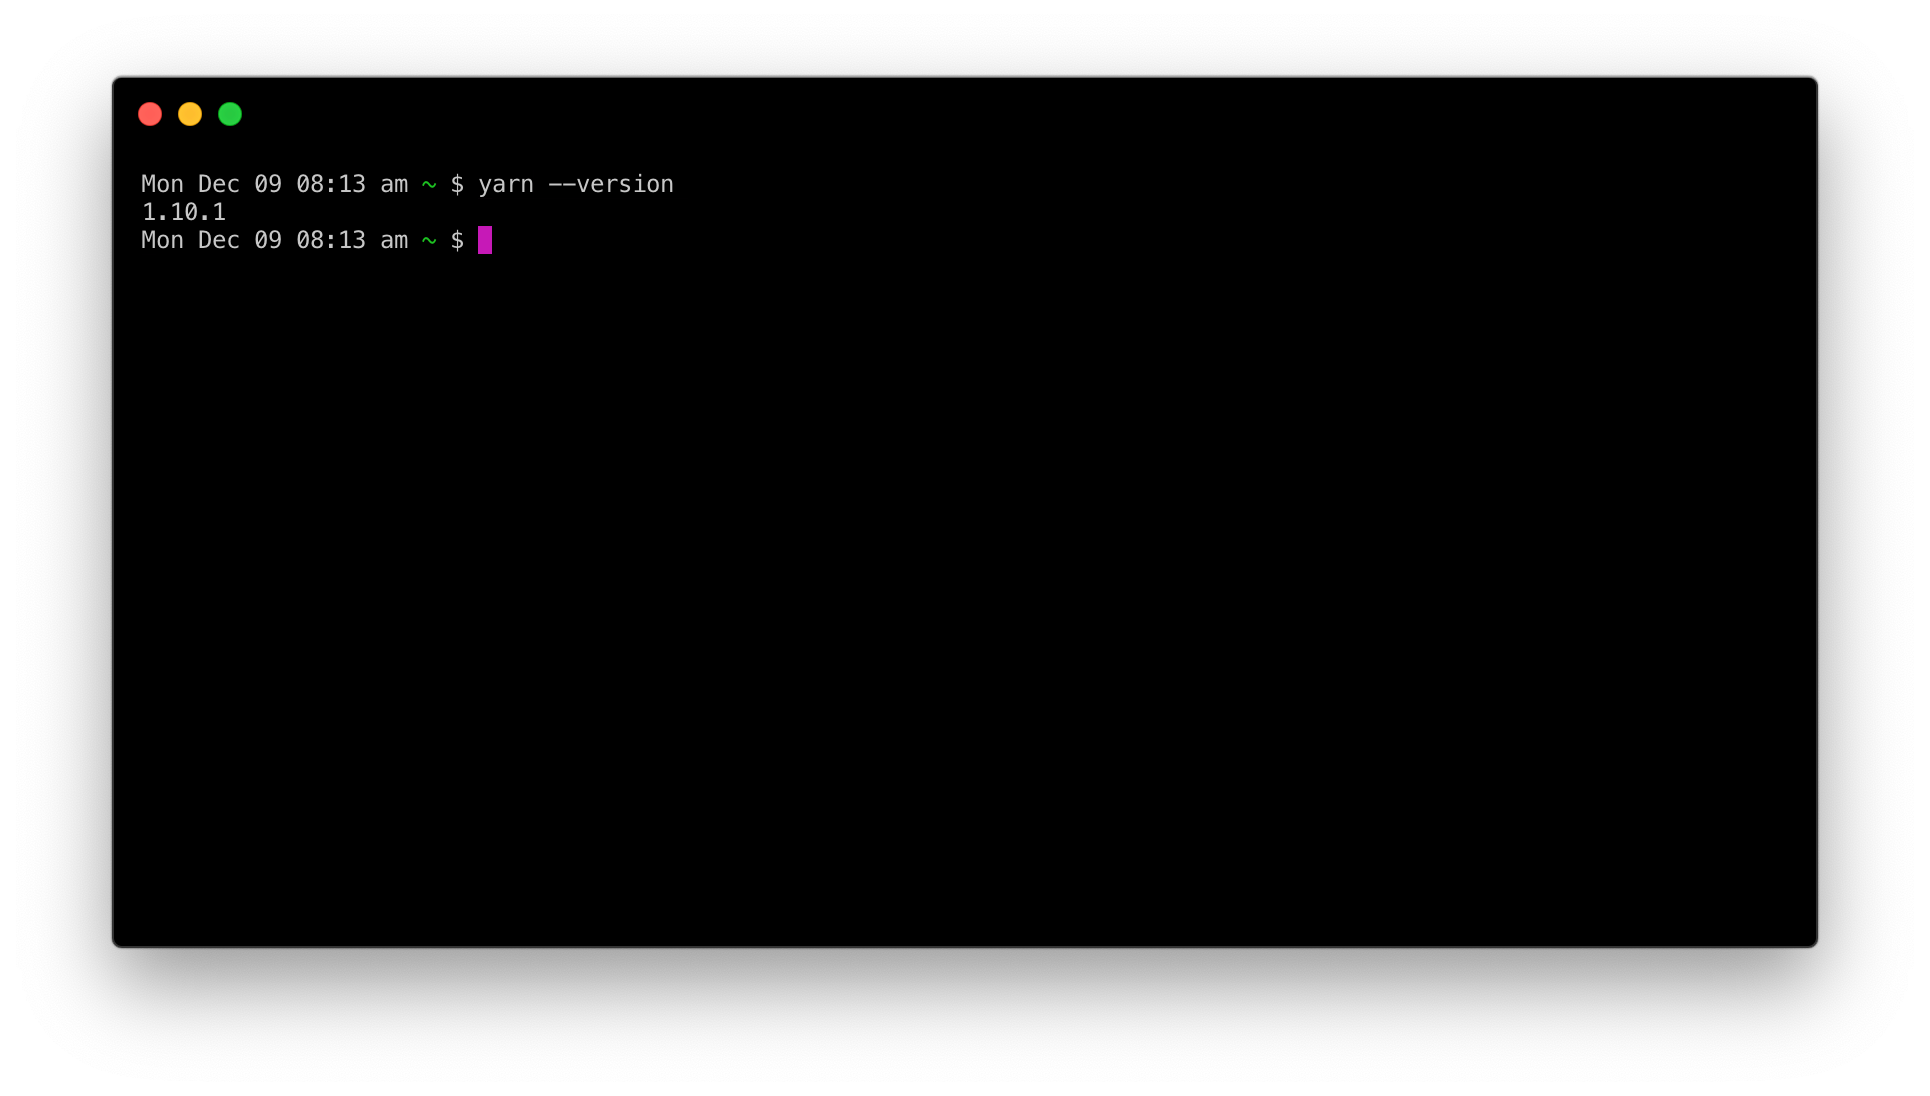
Step 1: Install Yarn
Yarn is a package manager. It helps us manage our project’s dependencies.
If you’re new to programming, essentially you can think of this as a tool to help us easily download and use other people’s code.
Download and installation instructions are available **on the Yarn site**.
Once you’ve installed yarn, verify that you can use it on the command line. Open a new terminal, and run:
**But what about NPM?
**You may have seen that NPM is the de facto package manager in the Javascript community, and may wonder why I’m suggesting Yarn.
Without getting too far off-topic, Yarn is a concerted effort by the community to improve package management. Internally it still uses the NPM package repository, so you can still install all the same packages.
Over the past couple of years, the default NPM client has improved. If you’re already comfortable with NPM, you can use it instead. Alternative NPM instructions will be provided as we go along.
Step 2: Create a React application
When people talk about complexity in React development, often they’re referring not to React itself, but in the build system and development environment.
They have a point — as React developers, we tend to build pretty complex dev environments and build systems. We suffer this complexity because it makes React development quicker and more enjoyable.
However, that complexity is overwhelming for those just getting started, and worse, it gets in the way of learning what’s really important: React itself.
Thankfully, there is a have-your-cake-and-eat-it-too solution. It’s called **create-react-app.**
create-react-app is a command-line tool, owned by Facebook and maintained by talented developers both at Facebook and in the community. It’s amazing. It abstracts away all the complexity and difficulty of implementing Webpack, Babel, a dev server, a production build process, and a thousand other tedious-but-critical things.
It’s zero-configuration by default, and doesn’t clutter up your project directory with a bunch of files you don’t understand.
Note: Eventually, you will want to spend the time learning how this works internally. There’s a lot of neat stuff you can do with Webpack, for example. Our top priority at the moment, though, is getting you excited about building with React, so we can defer this stuff for later.
Yarn comes with a built-in helper for using create-react-app:
yarn create react-app [your-app-name]
I’d like my application to be named cats-n-stuff, so I’ll run that:
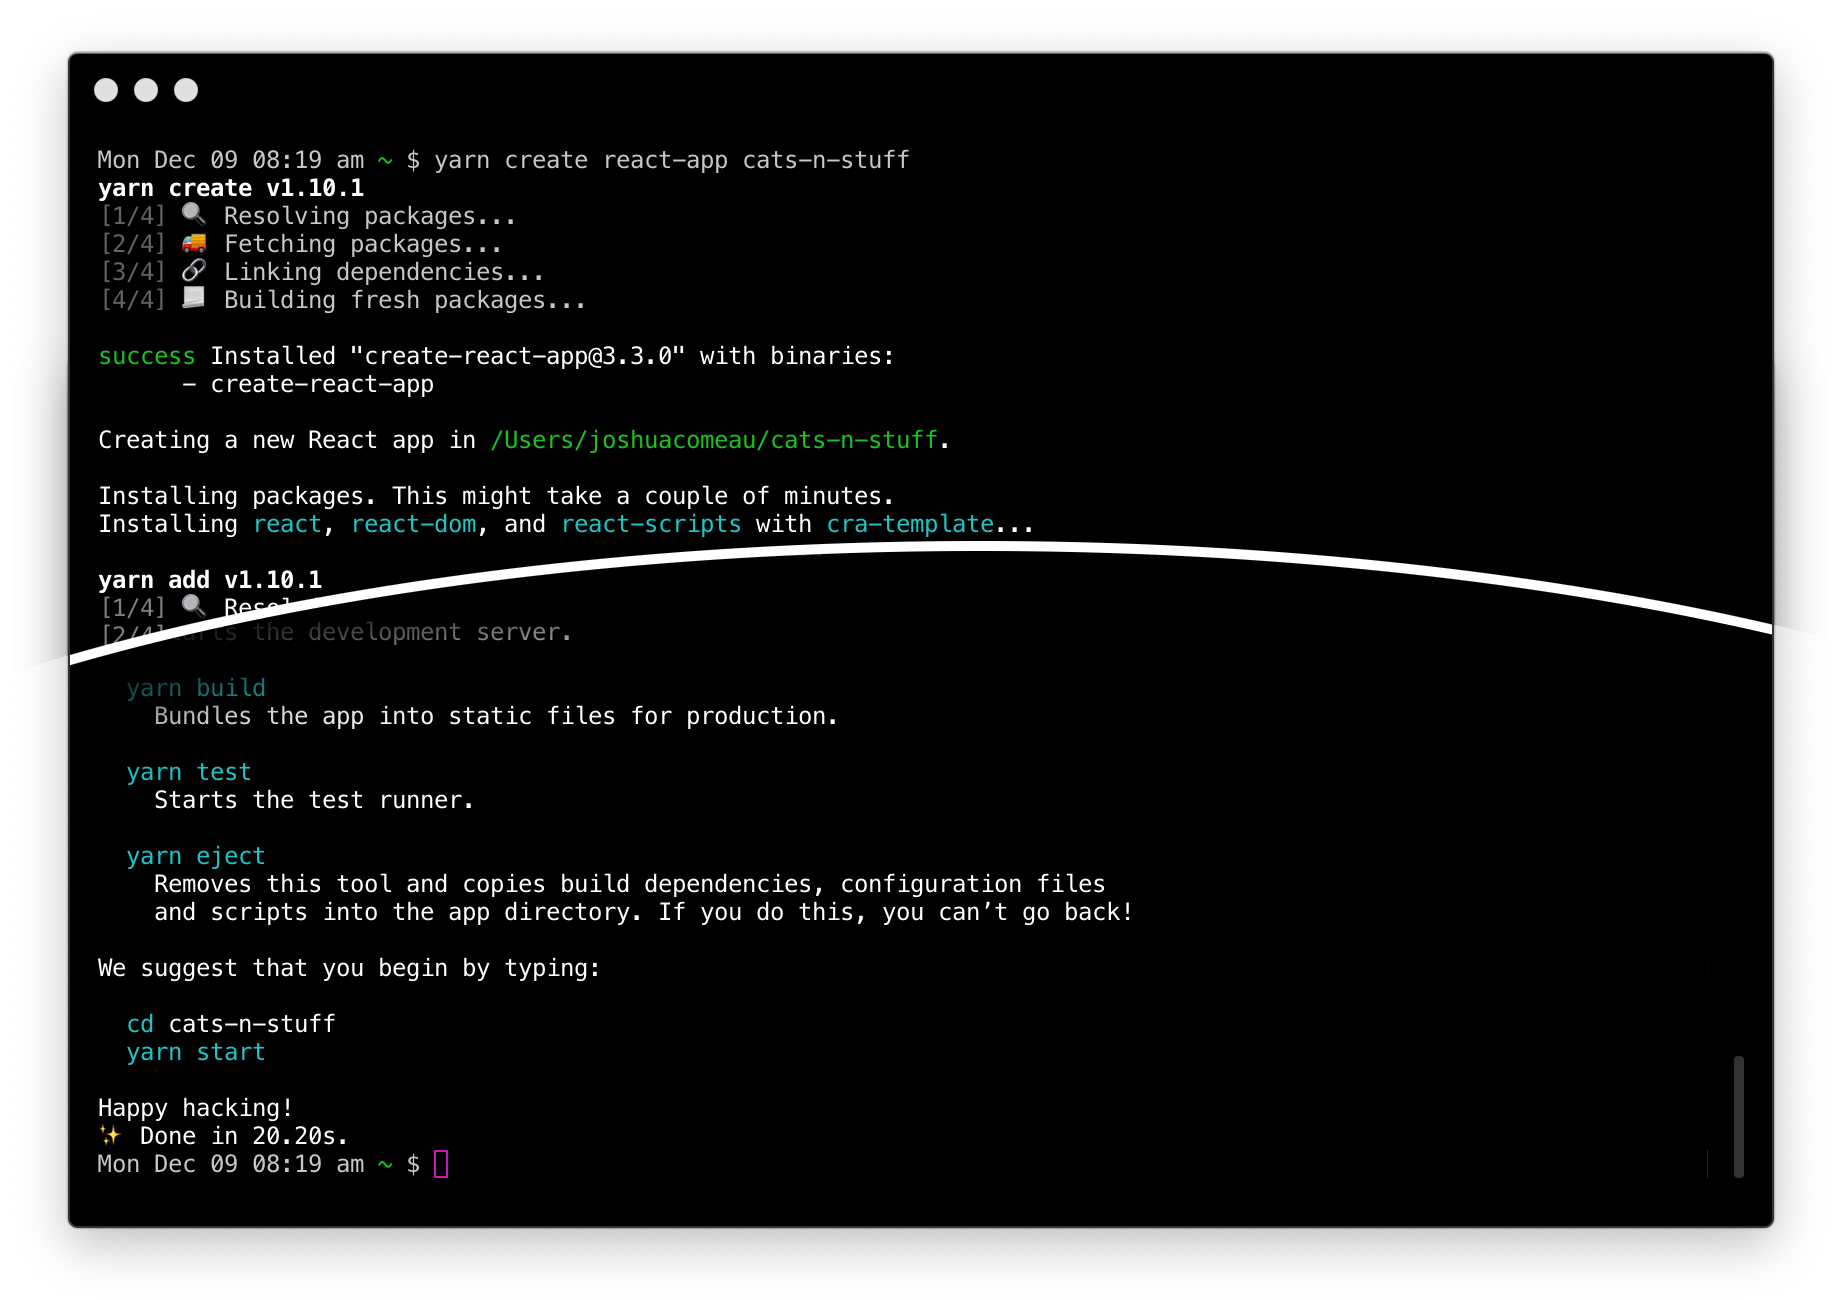 *The actual terminal output is *a lot, so this screenshot cuts out a bunch of stuff in the middle.**
If you get an error starting with “A template was not provided”, it’s likely because you have an earlier incompatible version of create-react-app installed. Check out this StackOverflow answer.
If you’re using NPM instead of yarn, you can run “npx create-react-app cats-n-stuff” to achieve the same result.
This command does quite a few things:
- Downloads and installs create-react-app
- Creates a new project folder, cats-n-stuff (or whatever you name your app)
- Scaffolds out a new project, including everything you need to compile a production-ready app, as well as run a development server
- Installs dependencies
You’ll notice the output towards the end gives you a set of commands.
Let’s start by following its instructions:

We should see the following output:
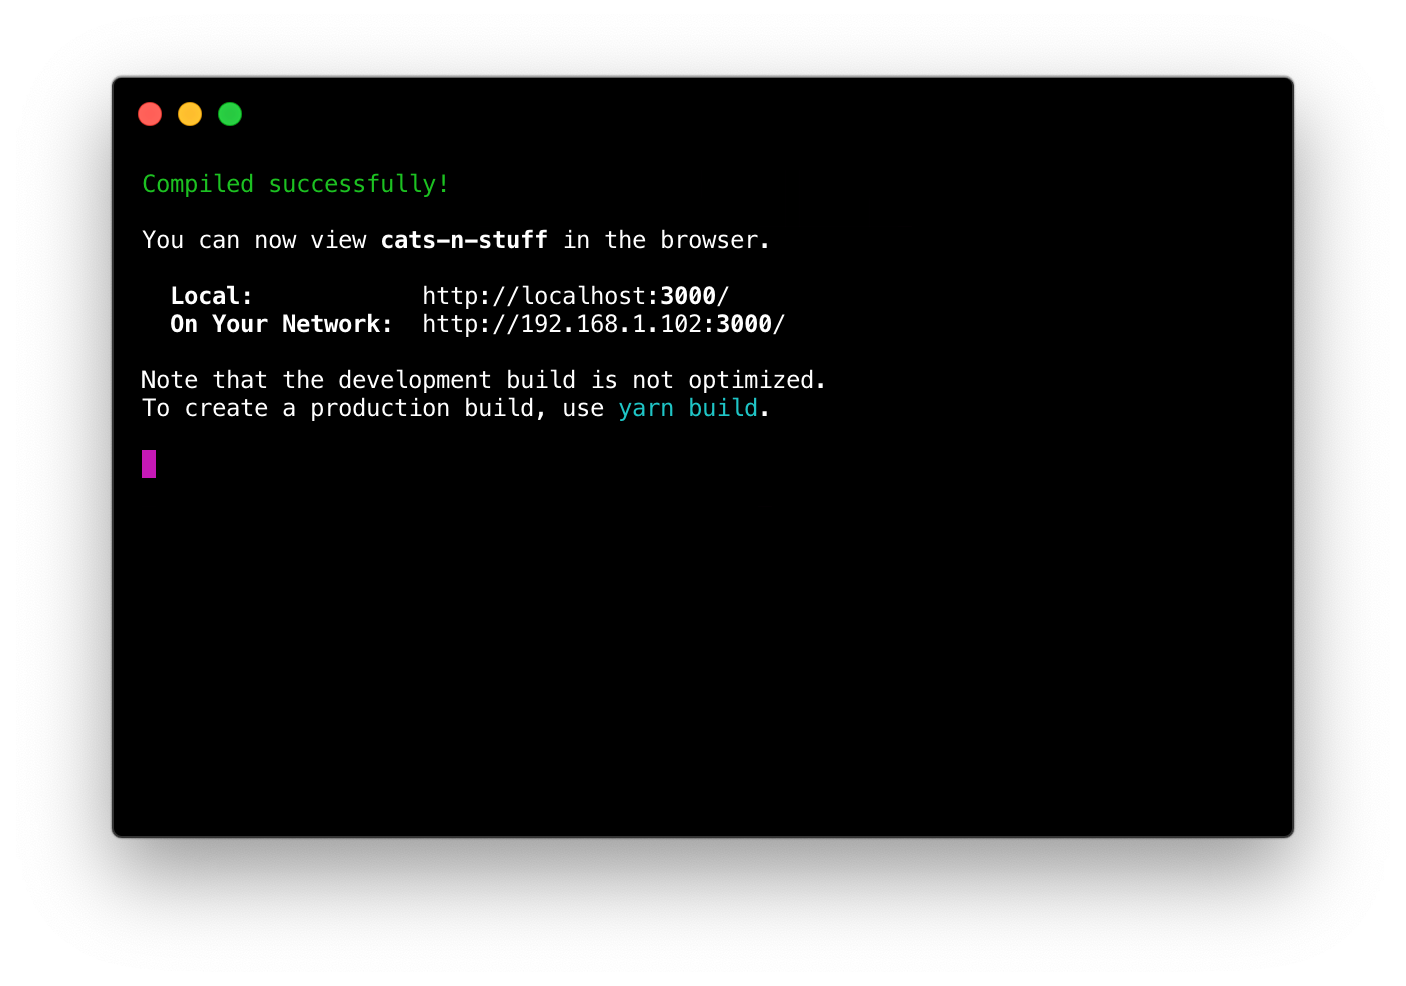
A browser window should also have opened, showing the following:

Let’s open our new project in our code editor. I’m using VS Code. You should see the following files:

Let’s go through them:
node_modules
This directory holds all of our project dependencies, like react and react-dom. It also includes all the dependencies needed to run our build system and development server. Sometimes, folks are alarmed by the size of this directory (~200mb), but it’s important to remember that it includes a whole bunch of dev tooling. Very little code is actually shipped to the user.
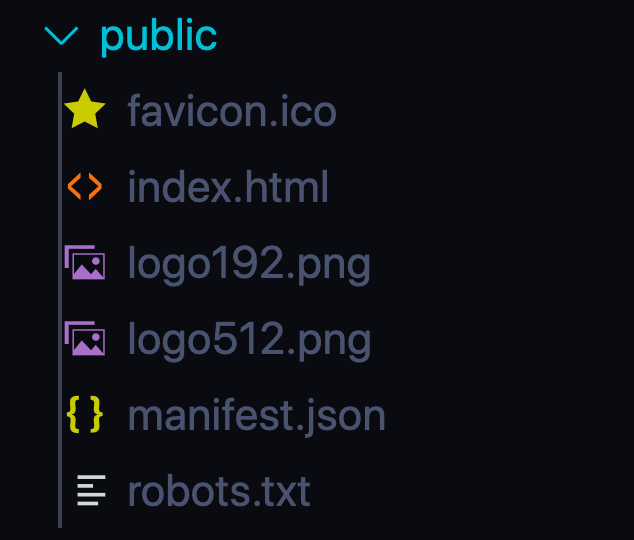
public
This directory holds static assets, stuff like our favicon and search-engine preferences. It also houses our project’s only HTML file. Because React is all-javascript, you only really need the HTML file to update the stuff, like title and meta tags. This can always be modified with React as well, but for now it can be simplest to add your own
to this file.</p>
<img src="https://cdn-images-1.medium.com/max/2000/1*MuMaVmwI-3SgnH6aAlHl1g.png">
<h3>src</h3>
<p>This directory holds the source code we’ll write to build our application. By default, <em>create-react-app</em> comes with one component — App — and an <em>index.js</em> file that mounts it. It also includes some CSS files — it’s conventional in the React community to colocate styles and code, so that each component has its own stylesheet.</p>
<p>For now, you can ignore the final two files, <em>serviceWorker.js *and</em> setupTests.js*. We don’t need to fuss with them yet.</p>
<h3>Root directory</h3>
<p>Finally, the root directory of the project holds stuff related to dependencies (<em>package.json</em> and <em>yarn.lock</em>), as well as a comprehensive documentation (<em>README.md</em>) for create-react-app.</p>
<blockquote>
<p><strong>Is this only for beginners? Will I be handicapping myself down the line?</strong>
create-react-app abstracts away all configuration, to help you focus on writing the application itself. At some point, though, you may want to access that configuration.</p>
</blockquote>
<p>Thankfully, create-react-app has <a href="https://facebook.github.io/react/blog/2016/07/22/create-apps-with-no-configuration.html#no-lock-in"><strong>an</strong> <strong>eject</strong> **feature</a>** that removes this abstraction and exposes the underlying configuration. This means that create-react-app is a brilliant tool not just for newcomers, but also for experienced React devs.</p>
<p>A few years back, it was common to spend the first day on a new project getting the build system and development server set up. Now that you know this process, it should only take a few minutes! And, unlike the days of installing jQuery and firing up an editor, we have a *bunch *of fantastic tooling that makes our life easier:</p>
<ul>
<li>A development server will auto-refresh / hot-reload when we save our files</li>
<li>We can use modern JS features without worrying about browser compatibility, since <em>babel</em> will translate your code into an older version of JS that all major browsers can understand</li>
<li>You can import all kinds of files into your JS code, including CSS and images.</li>
<li>Your editor will warn you when you’re making mistakes, including things that may not be so obvious (like accessibility concerns)</li>
</ul>
<h2>Step 3: Write your application</h2>
<p>Alright, our project is ready to roll. Now we have to build our app.</p>
<p>I have a single piece of advice that I often find myself giving, when people are getting started: <strong>learn React on its own first.</strong></p>
<p>If you follow many of the tutorials intended for intermediate or advanced users, you may think you need to learn about and install a dozen “supplementary” packages. After all, React is just the view layer, right?</p>
<p>Wrong. Facebook used to say that React was the “V” in “MVC”. They <a href="https://twitter.com/dan_abramov/status/741462507861233665">stopped using that language</a>, because it isn’t true; React is an entirely different paradigm, not simply a template renderer. The truth is that React is surprisingly capable <em>on its own</em>.</p>
<p>For example, you don’t need to install Redux or any other state management library at first. I really like Redux, but it will be overwhelming if you try and learn them together, and React comes with a built-in solution for state management: React state.</p>
<p>I believe the best way to learn is to make several small “weekend project” applications. Try and <a href="https://reactjs.org/tutorial/tutorial.html">make a game</a>, or validate a form, or build a mini component library. These kinds of projects don’t require any additional dependencies.</p>
<p>Once you’ve built a couple test projects, you probably will want to add <a href="https://reacttraining.com/react-router/web/guides/quick-start">React Router</a>. Because React doesn’t come with a built-in router, it does feel pretty critical. <a href="https://gist.github.com/joshwcomeau/2a31d790fbd80edae0a562e96d503a46">Building your own router</a> can be a fun educational project, but I’m also pragmatic enough to realize that sometimes you just want to build a project, and using React Router will unblock you.</p>
<p>You may discover, after your second or third small React project, that certain things are more painful than you’d like. Maybe your homegrown router is proving to be too much trouble, or maybe you feel like your application’s state is hard to manage. This is when you should be searching for pre-existing solutions; <em>after</em> you’ve encountered the problem, not before<strong>.</strong></p>
<p>Spend time learning React on its own. Add dependencies as you need them. Try to solve problems yourself; if nothing else, you’ll understand the benefits provided by those dependencies.</p>
<p><img src="https://cdn-images-1.medium.com/max/3500/1*bwSnfsOujX_dLfIU59FhWw.jpeg" alt="Dan Abramov, co-creator of Redux, explaining that Flux libraries like Redux aren’t always needed. [https://twitter.com/dan_abramov/status/704304462739939328](https://twitter.com/dan_abramov/status/704304462739939328)"><em>Dan Abramov, co-creator of Redux, explaining that Flux libraries like Redux aren’t always needed. <a href="https://twitter.com/dan_abramov/status/704304462739939328">https://twitter.com/dan_abramov/status/704304462739939328</a></em></p>
<h3>Resources for learning React</h3>
<p>After spending some time googling for React tutorials, I’ve realized exactly why newcomers find React so confusing.</p>
<p>It’s actually pretty tough to find reliable, up-to-date tutorials that cover React on its own, without delving into webpack and redux and a million other things.</p>
<p>Here are the resources I’ve found that do the job:</p>
<ol>
<li><a href="https://facebook.github.io/react/tutorial/tutorial.html">**Official React Tutorial</a>** — Straight from the official team. Build a Tic Tac Toe game.</li>
<li><a href="https://www.robinwieruch.de/the-road-to-learn-react/">**The Road to Learning React</a>** — A pay-what-you-want ebook that builds a fully-functional HackerNews clone, using create-react-app and minimal third-party libraries. Fantastic resource.</li>
<li><a href="https://daveceddia.com/pure-react/">**Pure React</a> **— A great React book by Dave Ceddia</li>
<li><a href="https://www.taniarascia.com/getting-started-with-react/">**Getting Started with React</a>** — A wonderful blog post by Tania Rascia</li>
</ol>
<h3>Hooks?</h3>
<p>2019 was a big year for React, and one of the biggest changes was the stable release of “hooks” in February. Hooks are a modern React feature that let you access React features like state and refs and lifecycle methods from within functional components.</p>
<p>A common question I see is whether or not you should learn hooks or class components. My personal belief is that hooks are the future, and I’ve heard that it can be simpler and faster to start with hooks. But ultimately, both are important, and it doesn’t really matter which order you learn them in.</p>
<h2>Step 4: Deploy</h2>
<p>Alright, you’ve built an awesome little toy app. Now you want to show your creation to the world. How do we get this thing online?</p>
<p>Web development is fun, and it’s even better when you wind up with something neat to show off. There’s an incredible amount of satisfaction achieved by showing the world <a href="https://tinkersynth.com/">your</a> <a href="https://beatmapper.app/">random</a> <a href="https://pudding.cool/2018/02/waveforms/">side</a> <a href="http://panther.audio/">projects</a>.</p>
<p>The first thing we’ll need to do is build our project.</p>
<img src="https://cdn-images-1.medium.com/max/2812/1*WRkRyMCTDP_EJZf7NbBSYg.png">
<blockquote>
<p>**What does this do?
*<em><code class="language-text">build</code> is an NPM script provided by create-react-app. It bundles up your code into ready-to-deploy static files. After running it, you’ll notice a new *build</em> directory in your project, including all the compiled JS and HTML needed to run your project.</p>
</blockquote>
<p>Builds also use the production version of React, which means it runs faster and doesn’t include the development-mode helpers like error screens.</p>
<h3>Deployment services</h3>
<p>As with everything else in modern web development, there are a bunch of options for how to actually get your built files onto the internet.</p>
<p><a href="https://github.com/facebookincubator/create-react-app/blob/master/packages/react-scripts/template/README.md#deployment">Create-react-app’s documentation</a> covers several possible deployment options, and in my experience, <a href="http://surge.sh">Surge.sh</a> is the quickest, simplest way to get code online quickly.</p>
<p>Let’s install it with Yarn:</p>
<img src="https://cdn-images-1.medium.com/max/2812/1*HZ9TsA2QTsiVTt4EkF6aiA.png">
<p>We install it globally so that we can use its CLI tool. Let’s run it now:</p>
<div class="gatsby-highlight" data-language="text"><pre class="language-text"><code class="language-text">surge</code></pre></div>
<p>The first time you run <em>surge</em>, it will prompt you to create an account. Enter your email and come up with a new password.</p>
<p>After that, it’ll ask you for a project path. **This is important: *<em>it should auto-fill the current location, but we need to add /</em>build* to the path, since that’s where the static, compiled files are.</p>
<p>Finally, you can pick a domain. It’ll suggest one at random, or you can try your own.</p>
<img src="https://cdn-images-1.medium.com/max/2812/1*ZCzAGlflMCoS2u3zw3wGkg.png">
<p>Remarkably, this is all we have to do. Surge will ship our files to the domain indicated. Check it out:</p>
<img src="https://cdn-images-1.medium.com/max/5644/1*kbhqocayxaWstSThIsrMBg.png">
<h3>Simplifying repeat deploys</h3>
<p>If we wanted to, we could just repeat this process every time; build, run <em>surge,</em> and then specify a project path and domain name.</p>
<p>We can use NPM scripts to be a little fancy though. Open up your <em>package.json</em>, and find the section for “scripts”. You should find the ones we’ve used already, like “start” and “build”. Let’s add a new one:</p>
<div class="gatsby-highlight" data-language="text"><pre class="language-text"><code class="language-text">"deploy": "yarn run build && surge -p build -d your-domain.surge.sh"</code></pre></div>
<p>Terminal commands can be stringed together with &&, and so we can create a single NPM script to do all the stuff we need. We build a fresh copy of our project, and then deploy it with Surge, pre-filling some of the required fields.</p>
<p>This command starts by building the latest version of our project, and then invoking Surge with some default arguments. Here’s my “scripts” object in package.json, with the new deploy script:</p>
<img src="https://cdn-images-1.medium.com/max/2820/1*a2M7MrzHODPud5M_GsaMCg.png">
<p>Now, all we have to do is run a single command, and in under 20 seconds, our glorious project is up for anyone to see.</p>
<img src="https://cdn-images-1.medium.com/max/2812/1*LgTjvmgQsRpZbmnHUinNXw.png">
<h3>Other deployment options</h3>
<p>Surge is the quickest way I’ve found to get a project online, but there are plenty of options. I really like <a href="https://www.netlify.com/">Netlify</a> — it takes a slight bit more work to get an initial deploy going, but it gives you a ton of stuff in return, including a free SSL certificate and automatic deploys when you push your code to GitHub.</p>
<h2>Frameworks like Gatsby and Next</h2>
<blockquote>
<p>Disclaimer: I work for Gatsby!</p>
</blockquote>
<p>React applications have gotten a reputation for being bloated and performing poorly. I don’t think this is quite fair — React does <em>a lot</em> out of the box to make sure its performance is good! — but there is one bit of undeniable truth: by default, React applications do all of their work on the client.</p>
<p>This means that when you load a React application, the initial HTML document is blank, and React has to load all of the JS it needs before the user can see anything.</p>
<p>A common way around this problem is called <em>server-side rendering (SSR)</em>. The idea with SSR is that the HTML file can be built before being delivered to the user. Javascript will still run in the browser (otherwise, it wouldn’t be an interactive application), but the idea is that the user shouldn’t have to stare at a white screen while that happens.</p>
<p>create-react-app is a great choice for getting started, but it’s really pretty minimal; it gives you the dev tooling you need to get started fast, and stays out of your way. Over the past few years, frameworks have popped up that offer a bunch of additional features, while still being built on top of React.</p>
<h3>Gatsby</h3>
<p><a href="https://www.gatsbyjs.com/">Gatsby</a> is sometimes billed as a “static site generator” — It can be used similarly to Hugo or Jekyll. It’s quite a bit more powerful than that, though!</p>
<p>Gatsby builds all of your HTML files at “compile time”, when you build your site, instead of at “runtime” when the user wants to use it. It’s super quick, since unlike server-side rendering, all of the work is done before the user even makes the request!</p>
<p>In addition to this performance focus, we’re doing a lot of really cool stuff at Gatsby, but it’s beyond the scope of this article.</p>
<h3>Next</h3>
<p><a href="https://nextjs.org/">Next</a> is built on a powerful idea: routing should be mirrored in the filesystem, the way it was with PHP. You can create individual components to handle each route, so a file at <em>pages/about/the-team</em> can be reached at <em>your-domain.com/about/the-team</em>.</p>
<p>In addition to this clever routing scheme, Next comes with built-in server-side rendering and automatic code-splitting, two powerful features that keep bundle sizes small and responses quick.</p>
<p>Both Gatsby and Next are great options when looking to build a “real life” project. If you’re just starting out, it probably makes sense to stick with create-react-app until you’re comfortable with React fundamentals.</p>
<h2>Conclusion</h2>
<p>There are two misconceptions that newcomers often have about React:</p>
<ul>
<li>It takes forever to set up a decent build system and dev environment. You can’t start writing your actual application code until you spend <em>hours</em> getting that set up.</li>
<li>React is a small piece of the toolset needed to create basic web applications, and you have to learn a dozen other things before you can get started.</li>
</ul>
<p>I hope I’ve done a good job disproving these theories. You can get started <em>in seconds</em> building a glorious front-end web application, and you can start without any extra dependencies.</p>
<h3>Addendum: Community Resources</h3>
<p>By far the most popular community hub for React developers is <a href="https://www.reactiflux.com/">**Reactiflux</a>**. It’s a great place to meet React developers, and get help if you find yourself stuck or confused.</p>
<p>For myself personally, Twitter has been an amazing source to learn more about React and meet the community. Dan Abramov, a member of the React core team and co-creator of Redux, has a <a href="https://medium.com/@dan_abramov/my-react-list-862227952a8c">**great list of people to follow</a>**.</p>
<blockquote>
<h1>Thanks for reading!</h1>
<h1>I’m keen to hear your feedback on this article! Anything I could do to make it more beginner-friendly? Let me know <a href="https://twitter.com/JoshWComeau">**on twitter</a>**.</h1>
</blockquote>
<iframe src="https://medium.com/media/3c851dac986ab6dbb2d1aaa91205a8eb" frameborder=0></iframe></article></main><section class="pagination"><a class="next" href="/blog/flutter/"><span>← Next</span><h3>Flutter for Beginners.</h3></a></section><footer class="footer"><span>Aditya</span><a href="https://twitter.com/" alt="Link to my Twitter page">twitter</a><a href="https://github.com/" alt="Link to my Github page">Github</a><a href="https://dribbble.com/" alt="Link to my Dribbble page">Dribbble</a><a href="https://dev.to/" alt="Link to my the Practical Dev profile page">Dev.to</a></footer></div></div><div id="gatsby-announcer" style="position:absolute;top:0;width:1px;height:1px;padding:0;overflow:hidden;clip:rect(0, 0, 0, 0);white-space:nowrap;border:0" aria-live="assertive" aria-atomic="true"></div></div><script id="gatsby-script-loader">/*<![CDATA[*/window.pagePath="/blog/react/";/*]]>*/</script><script id="gatsby-chunk-mapping">/*<![CDATA[*/window.___chunkMapping={"app":["/app-7072685448f9ff2903de.js"],"component---src-pages-404-js":["/component---src-pages-404-js-a0e1bf2585597e102d25.js"],"component---src-pages-about-js":["/component---src-pages-about-js-b2a021edf2a25cb71961.js"],"component---src-pages-index-js":["/component---src-pages-index-js-d870f2bf39ed04303e30.js"],"component---src-templates-blog-post-js":["/component---src-templates-blog-post-js-91890874e33d69808810.js"]};/*]]>*/</script><script src="/component---src-templates-blog-post-js-91890874e33d69808810.js" async=""></script><script src="/commons-bbd796e08c87cf1810f8.js" async=""></script><script src="/styles-c2fe8482057191dca484.js" async=""></script><script src="/app-7072685448f9ff2903de.js" async=""></script><script src="/framework-5fc6169171e885c3b522.js" async=""></script><script src="/webpack-runtime-be1bc6c973d845376cdb.js" async=""></script></body></html>